2023.06.17 - [Project/Airbnb Clone] - [Airbnb 클론코딩] Auth UI
[Airbnb 클론코딩] Auth UI
2023.06.11 - [Project/Airbnb Clone] - [Airbnb 클론코딩] 환경설정 및 Navbar UI(With. Youtube) [Airbnb 클론코딩] 환경설정 및 Navbar UI(With. Youtube) 유튜브를 보던 중에 Airbnb 클론코딩을 하는 것을 보았다. 그래서 Next.
hu-bris.tistory.com
Prisma setup
기능 구현에 들어가기 앞서 Prisma를 설치해야 한다.
Prisma는 자바스크립트와 타입스크립트 커뮤니티에서 주목받고 있는 차세대 ORM(Object Relational Mapping) 프레임워크이다.
npm install -D prisma
npx prisma init
해당 커맨드로 prisma를 설치하고 초기화하면 관련 파일(prisma 폴더,.env)이 생길 것이다.
초기 파일을 보면 postgresql로 설정되어 있는데 우리는 MongoDB를 사용할 것이다.
datasource db {
  provider = "mongodb"
  url      = env("DATABASE_URL")
}provider를 mongodb로 변경하고 .env 파일에 url를 mongodb 연결 url로 변경한다.
mongodb의 url은 구글링하면 나오는 부분이기 때문에 따로 언급하지는 않겠다.
이제 prisma를 이용해 모델링을 해보자.
User model
먼저 User 모델을 만들어보자.
model User {
  id             String    @id @default(auto()) @map("_id") @db.ObjectId
  name           String?
  email          String?   @unique
  emailVerified  DateTime?
  image          String?
  hashedPassword String?
  createdAt      DateTime  @default(now())
  updatedAt      DateTime  @updatedAt
  favoriteIds    String[]  @db.ObjectId

  accounts     Account[]
  listings     Listing[]
  reservations Reservation[]
}
각 필드의 중요한 속성들을 설명하자면
| @id | 주요 식별자(primary key) 역할 |
| @default(auto()) | auto-increment 기능 |
| @map("_id") | 해당 속성을 MongoDB의 기본적인 식별자 필드명인 "_id"필드와 매핑함 |
| @db.ObjectId | MongoDB에서 사용되는 ObjectId 타입으로 저장되어야 한다는 것을 나타냄 |
| @unique | 고유한 값이어야 함을 나타냄. 즉, 같은 이메일 주소를 가진 user를 생성할 수 없음 |
| @defualt(now()) | 현재 시간을 자동으로 할당 |
| @updatedAt | User가 업데이트될 때마다 자동으로 갱신 |
Account model
다음은 계정 모델이다.
model Account {
  id                String  @id @default(auto()) @map("_id") @db.ObjectId
  userId            String  @db.ObjectId
  tyep              String
  provider          String
  providerAccountId String
  refesh_token      String? @db.ObjectId
  access_token      String? @db.ObjectId
  expires_at        Int?
  token_type        String?
  scope             String?
  id_token          String? @db.ObjectId
  session_state     String?

  user User @relation(fields: [userId], references: [id], onDelete: Cascade)

  @@unique([provider, providerAccountId])
}| @relation | 각각의 인수들은 userId 필드로 User 모델의 id를 참조 onDelete: Cascade를 사용하여 User가 삭제될 때 연결된 Account도 함께 삭제 |
| @@unique | provider와 providerAccountId의 조합이 고유해야 함을 나타냄. 즉, 같은 provider와 providerAccountId를 가진 Account를 생성할 수 없음 |
Listing model
model Listing {
  id            String   @id @default(auto()) @map("_id") @db.ObjectId
  title         String
  description   String
  imageSrc      String
  createdAt     DateTime @default(now())
  category      String
  roomCount     Int
  bathroomCount Int
  guestCount    Int
  locationValue String
  userId        String   @db.ObjectId
  price         Int

  user         User          @relation(fields: [userId], references: [id], onDelete: Cascade)
  reservations Reservation[]
}
Reservation model
model Reservation {
  id         String   @id @default(auto()) @map("_id") @db.ObjectId
  userId     String   @db.ObjectId
  listingId  String   @db.ObjectId
  startDate  DateTime
  endDate    DateTime
  totalPrice Int
  createdAt  DateTime @default(now())

  user    User    @relation(fields: [userId], references: [id], onDelete: Cascade)
  listing Listing @relation(fields: [listingId], references: [id], onDelete: Cascade)
}
Listing 모델과 Reservation 모델은 다 설명한 속성이기 때문에 따로 설명하지는 않겠다.
이제 모델링이 끝났으므로 Prisma 스키마 파일의 상태를 데이터베이스로 푸시해보자.
npx prisma db push해당 커맨드를 통해 연결된 MongoDB에 컬렉션이 생기게 된다.
PrismaClient
Prisma ORM의 PrismaClient를 전역으로 사용하기 위한 설정을 해야합니다.
PrismaClient는 prisma를 통한 DB 수정작업을 할 수 있도록 해주는 도구이다.
npm install @prisma/client해당 커맨드로 패키지를 받습니다.
import { PrismaClient } from "@prisma/client";

declare global {
    var prisma: PrismaClient | undefined
}

const client = globalThis.prisma || new PrismaClient()
if (process.env.NODE_ENV !== 'production') globalThis.prisma = client

export default client;
간단하게 코드 리뷰를 하자면 globalThis.prisma 변수가 이미 정의되어 있다면 해당 변수를 client에 할당하고 그렇지 않은 경우 new PrismaClient()를 사용하여 새로운 PrismaClient 인스턴스를 생성하여 client에 할당한다.
NODE_ENV가 'production'이 아닌 경우, globalThis.prisma에 client를 할당한다. 이는 개발 환경에서만 PrismaClient 인스턴스를 재사용하고, 프로덕션 환경에서는 매번 새로운 인스턴스를 생성하는 것을 방지하기 위한 조건이다.
NextAuth
NextAuth는 Next.js의 로그인 등 인증 기능을 제공하며, Oauth를 통한 인증 기능 또한 제공하여 간단하게 구현할 수 있는 라이브러리이다.
npm install next-auth @next-auth/prisma-adapter
npm install bcrypt @types/bcrypt
해당 커맨드로 NextAuth를 설치받고 그 외 필요한 패키지도 받는다.
PrismaAdapter
next-auth는 모든 데이터베이스에서 사용할 수 있다. 어댑터를 사용하여 모든 데이터베이스 서비스 또는 여러 서비스에 동시에 연결할 수 있다.
공식문서에 따르면 파일 구조는 이렇다.
📦pages
┗ 📂api
┃ ┗ 📂auth
┃ ┃ ┗ 📜[...nextauth].ts
Next13부터 루트 디렉터리에 app 디렉터리 안에 api 디렉터리가 있는데 지금까지는 pages와 app 디렉터리를 혼용하여 사용한다.
import bcrypt from "bcrypt"
import NextAuth, { AuthOptions } from "next-auth"
import CredentialsProvider from "next-auth/providers/credentials"
import GithubProvider from "next-auth/providers/github"
import GoogleProvider from "next-auth/providers/google"
import { PrismaAdapter } from "@next-auth/prisma-adapter"

import prisma from "@/app/libs/prismadb"

export const authOptions: AuthOptions = {
  adapter: PrismaAdapter(prisma),
  providers: [
    GithubProvider({
      clientId: process.env.GITHUB_ID as string,
      clientSecret: process.env.GITHUB_SECRET as string,
    }),
    GoogleProvider({
      clientId: process.env.GOOGLE_CLIENT_ID as string,
      clientSecret: process.env.GOOGLE_CLIENT_SECRET as string,
    }),
    CredentialsProvider({
      name: 'credentials',
      credentials: {
        email: { label: 'email', type: 'text' },
        password: { label: 'password', type: 'password' }
      },
      async authorize(credentials) {
        if (!credentials?.email || !credentials?.password) {
          throw new Error('Invalid credentials');
        }

        const user = await prisma.user.findUnique({
          where: {
            email: credentials.email
          }
        });

        if (!user || !user?.hashedPassword) {
          throw new Error('Invalid credentials');
        }

        const isCorrectPassword = await bcrypt.compare(
          credentials.password,
          user.hashedPassword
        );

        if (!isCorrectPassword) {
          throw new Error('Invalid credentials');
        }

        return user;
      }
    })
  ],
  pages: {
    signIn: '/',
  },
  debug: process.env.NODE_ENV === 'development',
  session: {
    strategy: "jwt",
  },
  secret: process.env.NEXTAUTH_SECRET,
}

export default NextAuth(authOptions);
간단하게 리뷰하자면 Provider를 통해 Oauth 기능을 제공받고 이메일과 비밀번호를 통한 인증도 제공받을 수 있다.
bcrypt를 통해 입력한 비밀번호와 해시화된 비밀번호를 비교한다.
Register functionality
📦app
┣ 📂actions
┃ ┗ 📜getCurrentUser.ts
┣ 📂api
┃ ┗ 📂register
┃ ┃ ┗ 📜route.ts
이번에는 app 디렉터리르 사용해서 회원가입 api를 구현한다.
import { NextResponse } from "next/server";
import bcrypt from "bcrypt";

import prisma from "@/app/libs/prismadb";

export async function POST(
  request: Request,
) {
  const body = await request.json();
  const {
    email,
    name,
    password,
  } = body;

  const hashedPassword = await bcrypt.hash(password, 12);

  const user = await prisma.user.create({
    data: {
      email,
      name,
      hashedPassword,
    }
  });

  return NextResponse.json(user);
}
요청한 데이터를 User 컬렉션에 넣어주는 것이다. 넣어주기 전에 비밀번호를 해시화시킨다.
Login functionality
로그인 기능을 구현하기 전에 hook과 components에 Register와 관련된 파일들을 복사해 Login으로 바꿔주자.
거기에 로그인 컴포넌트에는 name 입력이 필요없기 때문에 지워주자.
const onSubmit: SubmitHandler<FieldValues> = (data) => {
    setIsLoading(true)

    signIn('credentials', {
      ...data,
      redirect: false,
    })
      .then((callback) => {
        setIsLoading(false)

        if (callback?.ok) {
          toast.success('Logged in')
          router.refresh()
          loginModal.onClose()
        }

        if (callback?.error) {
          toast.error(callback.error)
        }
      })
  }
이전에 회원가입 기능을 axios를 통해 사용했는데 next-auth의 signIn 기능을 사용하면 로그인 처리를 쉽게 할 수 있다.
로그인이 되었는지 확인하고 사용자의 메뉴탭을 변경해줘야 한다.
위의 파일구조처럼 getCurrentUser.ts를 생성한다.
import { getServerSession } from "next-auth/next";

import { authOptions } from "@/pages/api/auth/[...nextauth]";
import prisma from "@/app/libs/prismadb";

export async function getSession() {
  return await getServerSession(authOptions)
}

export default async function getCurrentUser() {
  try {
    const session = await getSession()

    if (!session?.user?.email) {
      return null
    }

    const currentUser = await prisma.user.findUnique({
      where: {
        email: session.user.email as string
      }
    })

    if (!currentUser) {
      return null
    }

    // return currentUser;
    return {
      ...currentUser,
      createdAt: currentUser.createdAt.toISOString(),
      updatedAt: currentUser.updatedAt.toISOString(),
      emailVerified: currentUser.emailVerified?.toISOString() || null
    }
  } catch (error: any) {
    return null
  }
}
현재 로그인되어 있는 유저의 세션을 가져와서 현재 유저를 확인하고 세션이 있다면 네이게이션바를 바꿔준다.
currentUser를 반환하는데 거기에 생성 날짜와 업데이트 날짜 등 Datetime을 string 형식으로 바꿔주고 있다.
이게 Warning 에러가 뜬다고 해서 문자열로 변환해준다고 하는데 나는 그런 Warning이 뜨지는 않았다.
{currentUser ? (
              <>
                <MenuItem
                  onClick={() => { }}
                  label="My trips"
                />
                <MenuItem
                  onClick={() => { }}
                  label="My favorites"
                />
                <MenuItem
                  onClick={() => { }}
                  label="My reservations"
                />
                <MenuItem
                  onClick={() => { }}
                  label="My properties"
                />
                <MenuItem
                  onClick={() => { }}
                  label="Airbnb my home"
                />
                <MenuItem
                  onClick={() => signOut()}
                  label="Logout"
                />
              </>
            ) : (
              <>
                <MenuItem
                  onClick={loginModal.onOpen}
                  label="Login"
                />
                <MenuItem
                  onClick={registerModal.onOpen}
                  label="Sign up"
                />
              </>
            )}
세션이 있으면 로그아웃을 포함한 메뉴가 생기고 없다면 로그인과 회원가입 메뉴가 나오도록 한다.
currentUser는 Navbar.tsx와 UserMenu.tsx 의 Props로 넣어준다.
Social Login
구글과 깃허브를 통해 로그인할 수 있도록 해주기 위해서 [...nextauth].ts 파일에서 Provider를 통해 기능을 넣어놨다.
깃허브는 Settings -> Developer Settings -> OAuth Apps를 통해서 클라우드 ID와 PW를 만들어 준다.
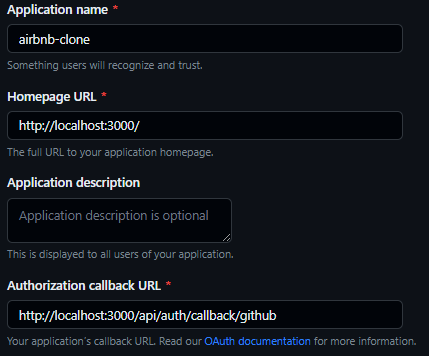
영상에서는 callback URL를 Homepage URL과 똑같이 했지만 에러가 계속 발생해서 구글 OAuth와 똑같이 콜백주소를 적었다.
<Button
    outline
    label="Continue with Github"
    icon={AiFillGithub}
    onClick={() => signIn('github')}
/>
그리고 버튼을 클릭했을 때, signIn을 통해서 로그인 시켜주면 된다.
구글은 Google Cloud Console을 통해서 진행한다. 이는 따로 설명하지 않겠다.
마무리
OAuth 기능으로 로그인이 계속 되지 않았다. 데이터베이스에 유저 컬렉션에는 데이터가 들어가지만 계정 컬렉션에는 데이터가 들어가지 않았다. 계속 안되길래 혹시나 싶어 최신 버전으로 바꿔보았다.
npm update해당 커맨드를 통해 업데이트를 해주니 정상적으로 작동했었다.
이제는 Category UI를 만들려고 한다.
'Project > Airbnb Clone' 카테고리의 다른 글
| [Airbnb 클론코딩] Fetching listings whith server components (0) | 2023.08.07 |
|---|---|
| [Airbnb 클론코딩] Listing creation (0) | 2023.07.11 |
| [Airbnb 클론코딩] Category UI (0) | 2023.07.02 |
| [Airbnb 클론코딩] Auth UI (1) | 2023.06.17 |
| [Airbnb 클론코딩] 환경설정 및 Navbar UI(With. Youtube) (0) | 2023.06.11 |