Dependency 추가
Spring Boot 2.x대 에서는 SpringFox를 사용했다고 하는데 업데이트가 되지 않는게 오래 되어서 이제는 SpringDoc를 사용한다고 한다.
SpringDoc는 스프링부트 2점대와 3점대가 의존성을 추가하는 방법이 다르다고 하니 버전에 맞게 잘 사용하면 될 것 같다.
이번 프로젝트에서 사용한 버전은 3.3.3이므로 아래와 같이 의존성을 추가해줬다.
implementation 'org.springdoc:springdoc-openapi-starter-webmvc-ui:2.6.0'사용법
다른 블로그를 보면 환경변수를 설정하거나 Config 설정을 하는것으로 나와 있는데
나는 따로 설정을 하지 않고 기본적으로 설정되어 있는데로 사용하였다.
대신에 Spring Security를 사용하기 때문에 인증 없이 접속할 수 있도록 설정해주었다.
...
	.authorizeHttpRequests(authorizeHttpRequests -> authorizeHttpRequests
            .requestMatchers("/", "/api/v1/auth/**", "oauth2/**").permitAll()
            .requestMatchers("/v3/**", "/swagger-ui/**").permitAll()
            .requestMatchers("/api/v1/admin/**").hasRole(UserRole.ADMIN.name())
            .anyRequest().authenticated()
        )
...
Swagger와 관련된 path를 모두 허용해준다.
@OpenAPIDefinition
API 명세서에 대한 설명을 설정할 수 있는 어노테이션이다.
@OpenAPIDefinition(info = @Info(title = "OAuth2.0 및 JWT 로그인 / 회원가입 API 명세서", description = "OAuth2.0, JWT 로그인 / 회원가입 학습하기 위한 API 명세서", version = "v1"))
public class Oauth2Application {

  public static void main(String[] args) {
    SpringApplication.run(Oauth2Application.class, args);
  }

}

입력한 제목과 내용, 버전이 출력되는 것을 확인할 수 있다.
@Tag
도메인 별 API를 그룹화하여 설명할 수 있는 어노테이션이다.
@Tag(name = "JWT 로그인 / 회원가입 API 명세서", description = "JWT를 이용한 로그인 및 회원가입 API 명세입니다.")
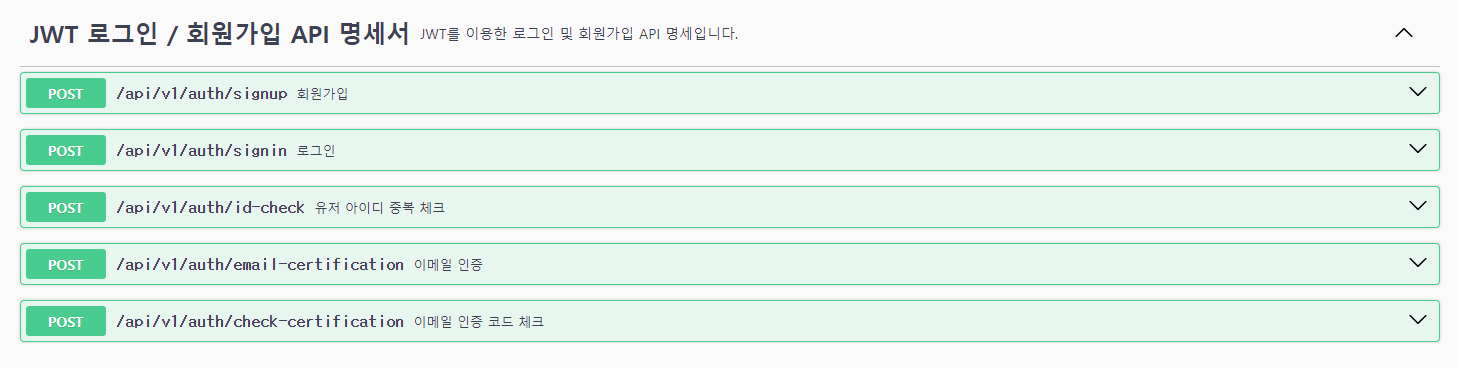
대부분 컨트롤러를 도메인 별로 만들기 때문에 컨트롤러에 사용한다고 생각하면 될 것 같다.
@Operation
특정 API에 대한 설명할 수 있는 어노테이션이다.
@Operation(summary = "유저 아이디 중복 체크", description = "유저 아이디가 중복되었는지 확인하는 API")
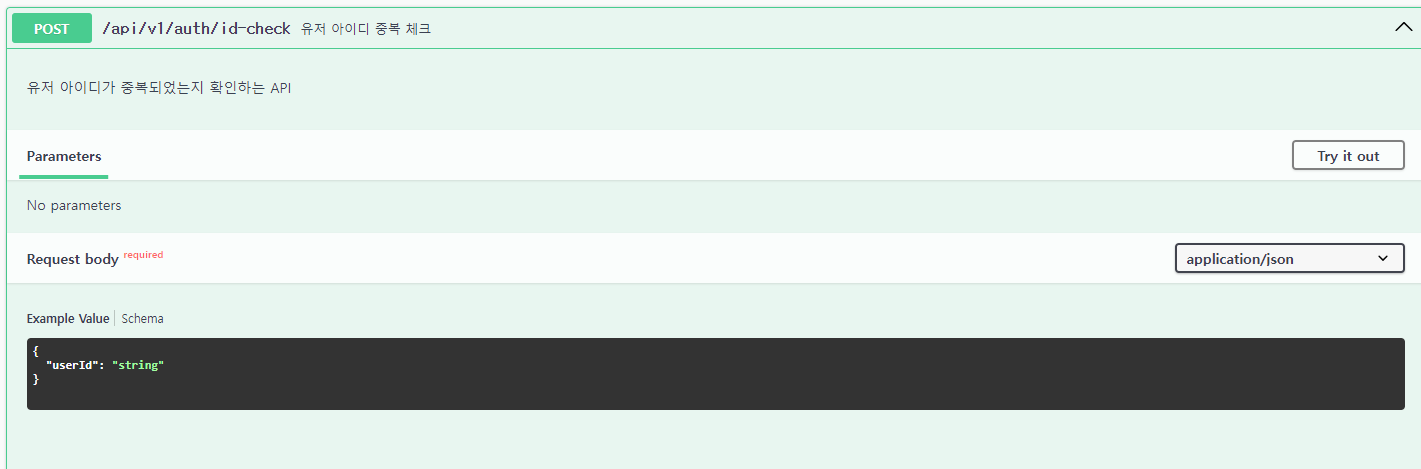
특정 API에 대한 이름과 설명을 붙일 수 있다.
각각의 메서드에 붙여서 사용하면 된다.
@ApiResponses, @ApiResponse
ApiResponses는 ApiResponse를 하나로 묶어서 사용하는 어노테이션이다.
ApiResponse는 API에 대한 응답을 설명할 수 있는 어노테이션이다.
@ApiResponses(value = {
      @ApiResponse(responseCode = "200", description = "Success", content = @Content(mediaType = "application/json", schema = @Schema(implementation = CertificationResponseDto.class))),
      @ApiResponse(responseCode = "400", description = "Validation failed & Duplication Id", content = @Content(mediaType = "application/json", schema = @Schema(implementation = CertificationResponseDto.class))),
      @ApiResponse(responseCode = "500", description = "Database error", content = @Content(mediaType = "application/json", schema = @Schema(implementation = CertificationResponseDto.class))),
})
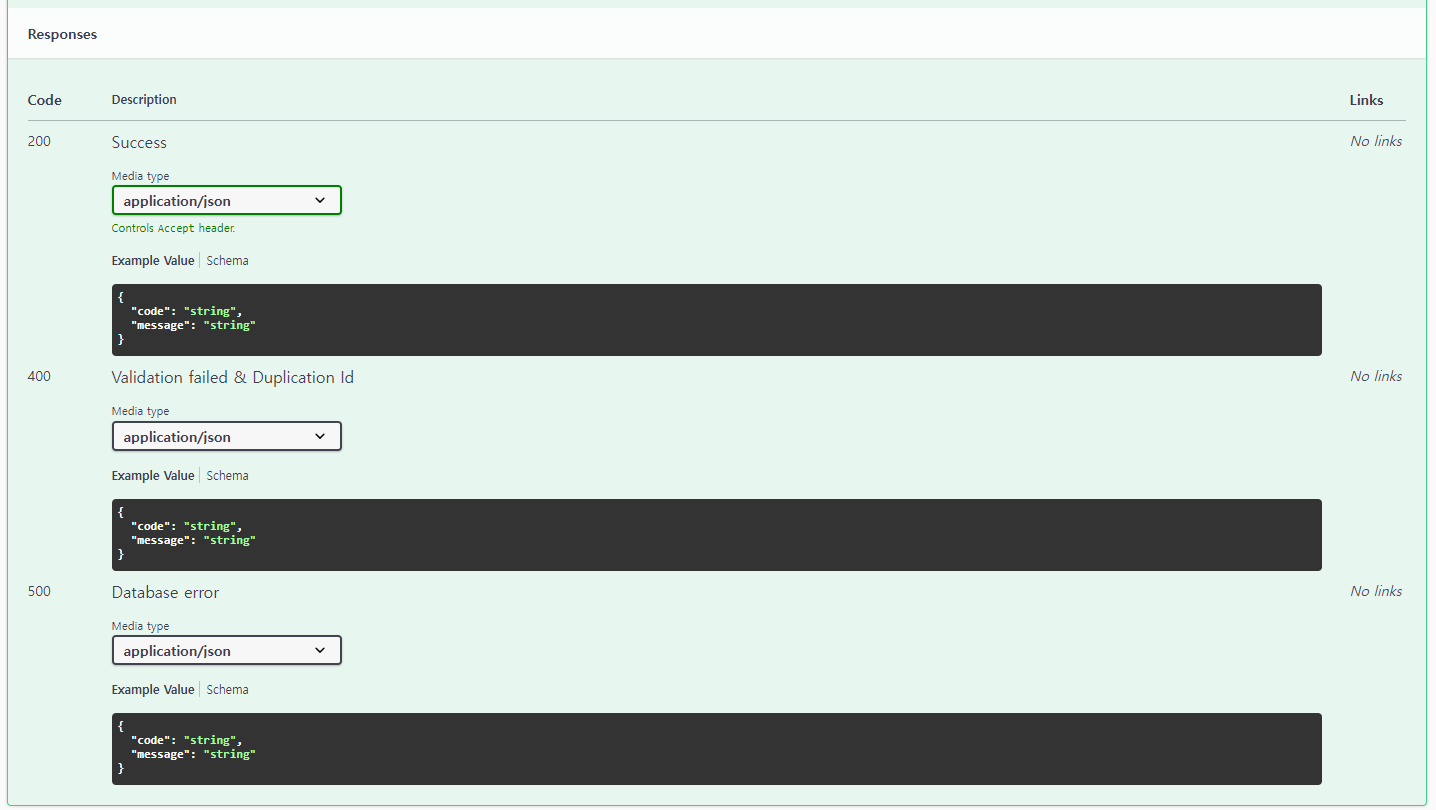
ApiResponse를 통해 각 응답 코드와 설명을 하면 된다.
ApiResponses는 여러 ApiResponse를 묶어 주는 역할인 것 같은데, 그냥 ApiResponses를 사용하지 않아도 되는 것 같다.
원래 Validation failed와 Duplication Id를 따로 분리했는데 같은 400번이라 먼저 나온 Validation failed만 나온다.
방법을 찾아봤는데 이렇게 하나로 설명을 묶는 것이 있고, 커스텀을 하는 방법이 있는 것 같은데 추후에 시도해봐야겠다.
전체 적용 코드
@RestController
@RequiredArgsConstructor
@RequestMapping("/api/v1/auth")
@Tag(name = "JWT 로그인 / 회원가입 API 명세서", description = "JWT를 이용한 로그인 및 회원가입 API 명세입니다.")
public class AuthController {

  private final AuthService authService;

  @Operation(summary = "유저 아이디 중복 체크", description = "유저 아이디가 중복되었는지 확인하는 API")
  @ApiResponses(value = {
      @ApiResponse(responseCode = "200", description = "Success", content = @Content(mediaType = "application/json", schema = @Schema(implementation = CertificationResponseDto.class))),
      @ApiResponse(responseCode = "400", description = "Validation failed & Duplication Id", content = @Content(mediaType = "application/json", schema = @Schema(implementation = CertificationResponseDto.class))),
      @ApiResponse(responseCode = "500", description = "Database error", content = @Content(mediaType = "application/json", schema = @Schema(implementation = CertificationResponseDto.class))),
  })
  @PostMapping("/id-check")
  public ResponseEntity<CertificationResponseDto> idCheck(
      @RequestBody @Valid IdCheckRequestDto requestDto
  ) {
    authService.idCheck(requestDto);
    return CertificationResponseDto.success();
  }

  @Operation(summary = "이메일 인증", description = "이메일로 인증 코드를 보내는 API")
  @ApiResponses(value = {
      @ApiResponse(responseCode = "200", description = "Success", content = @Content(mediaType = "application/json", schema = @Schema(implementation = CertificationResponseDto.class))),
      @ApiResponse(responseCode = "400", description = "Validation failed & Duplication Id", content = @Content(mediaType = "application/json", schema = @Schema(implementation = CertificationResponseDto.class))),
      @ApiResponse(responseCode = "500", description = "Mail Send failed & Database error", content = @Content(mediaType = "application/json", schema = @Schema(implementation = CertificationResponseDto.class))),
  })
  @PostMapping("/email-certification")
  public ResponseEntity<CertificationResponseDto> mailCertification(
      @RequestBody @Valid MailCertificationRequestDto requestDto
  ) {
    authService.mailCertification(requestDto);
    return CertificationResponseDto.success();
  }

  @Operation(summary = "이메일 인증 코드 체크", description = "이메일로 온 인증 코드를 확인하는 API")
  @ApiResponses(value = {
      @ApiResponse(responseCode = "200", description = "Success", content = @Content(mediaType = "application/json", schema = @Schema(implementation = CertificationResponseDto.class))),
      @ApiResponse(responseCode = "400", description = "Validation failed", content = @Content(mediaType = "application/json", schema = @Schema(implementation = CertificationResponseDto.class))),
      @ApiResponse(responseCode = "401", description = "Certification failed", content = @Content(mediaType = "application/json", schema = @Schema(implementation = CertificationResponseDto.class))),
      @ApiResponse(responseCode = "500", description = "Database error", content = @Content(mediaType = "application/json", schema = @Schema(implementation = CertificationResponseDto.class))),
  })
  @PostMapping("/check-certification")
  public ResponseEntity<CertificationResponseDto> checkCertification(
      @RequestBody @Valid CheckCertificationRequestDto requestDto
  ) {
    authService.checkCertification(requestDto);
    return CertificationResponseDto.success();
  }

  @Operation(summary = "회원가입", description = "유저 회원가입 API")
  @ApiResponses(value = {
      @ApiResponse(responseCode = "200", description = "Success", content = @Content(mediaType = "application/json", schema = @Schema(implementation = CertificationResponseDto.class))),
      @ApiResponse(responseCode = "400", description = "Validation failed & Duplication Id", content = @Content(mediaType = "application/json", schema = @Schema(implementation = CertificationResponseDto.class))),
      @ApiResponse(responseCode = "401", description = "Certification failed", content = @Content(mediaType = "application/json", schema = @Schema(implementation = CertificationResponseDto.class))),
      @ApiResponse(responseCode = "500", description = "Database error", content = @Content(mediaType = "application/json", schema = @Schema(implementation = CertificationResponseDto.class))),
  })
  @PostMapping("/signup")
  public ResponseEntity<CertificationResponseDto> signup(
      @RequestBody @Valid SignUpRequestDto requestDto
  ) {
    authService.signup(requestDto);
    return CertificationResponseDto.success();
  }

  @Operation(summary = "로그인", description = "유저 로그인 API")
  @ApiResponses(value = {
      @ApiResponse(responseCode = "200", description = "Success", content = @Content(mediaType = "application/json", schema = @Schema(implementation = SignInResponseDto.class))),
      @ApiResponse(responseCode = "400", description = "Validation failed", content = @Content(mediaType = "application/json", schema = @Schema(implementation = CertificationResponseDto.class))),
      @ApiResponse(responseCode = "401", description = "Login information mismatch", content = @Content(mediaType = "application/json", schema = @Schema(implementation = CertificationResponseDto.class))),
      @ApiResponse(responseCode = "500", description = "Database error", content = @Content(mediaType = "application/json", schema = @Schema(implementation = CertificationResponseDto.class))),
  })
  @PostMapping("/signin")
  public ResponseEntity<SignInResponseDto> signin(
      @RequestBody @Valid SignInRequestDto requestDto
  ) {
    String token = authService.signin(requestDto);
    return SignInResponseDto.success(token);
  }
}
마무리
위의 전체 적용 코드를 보면 컨트롤러가 Swagger 관련 어노테이션 때문에 지저분해 보이고 가독성이 떨어지는 것 같다.
어노테이션을 커스텀하는 방법이 있는 것 같으니 추후에 그 방법에 대해서 공부해봐야겠다.
'기타 > 개발일기' 카테고리의 다른 글
| [디자인 패턴] Spring Boot로 싱글톤 패턴 알아보기 (0) | 2024.12.29 |
|---|---|
| 좋은 코드란 무엇일까? (0) | 2024.08.31 |
| 대용량 트래픽을 처리하는 방법 (1) | 2024.06.09 |
| [Redis 캐싱 처리] Could not write JSON: Java 8 date/time type `java.time.LocalDateTime` not supported by default (0) | 2024.03.24 |
| [Spring Boot] Redis로 캐싱 처리 적용하기 (0) | 2024.03.24 |